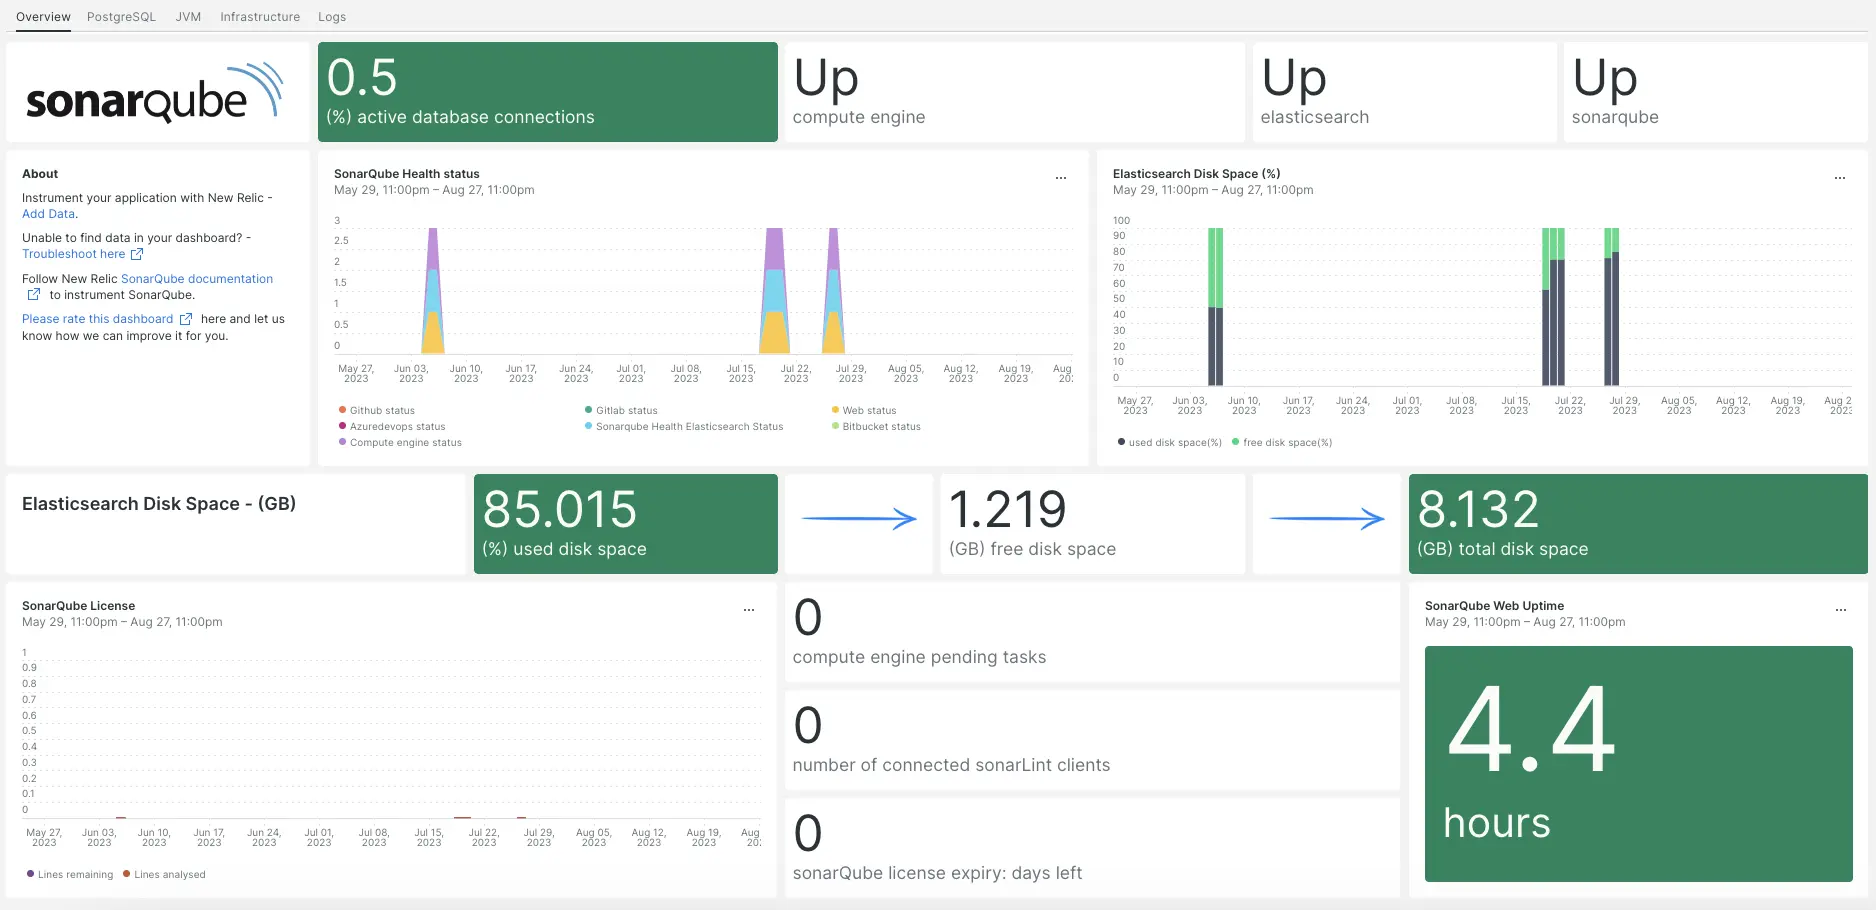
Notre intégration SonarQube monitore les performances de votre application SonarQube, vous aidant à diagnostiquer et à optimiser le code. Notre intégration SonarQube utilise notre agent infrastructure , l'intégration PosgreSQL, NRI-Prometheus et NRI-JMX et vous offre un dashboard prédéfini avec vos métriques SonarQube les plus importantes.

Après avoir configuré notre intégration SonarQube, nous vous fournissons un dashboard pour vos métriques SonarQube.
Installer l' agent d'infrastructure
Pour utiliser l’intégration SonarQube, vous devez d’abord installer l’agent d’infrastructure sur le même hôte. Toutes nos intégrations sur hôte nécessitent l'agent infrastructure , qui permet d'exposer et de rapporter les métriques à New Relic.
Installer l'intégration PostgreSQL
Pour utiliser l'intégration SonarQube, vous devez d'abord installer notre intégration PostgreSQL.
- Consultez nos exigences d’intégration PostgreSQL dans notre documentation avant d’installer l’intégration. Confirmez votre compatibilité, puis revenez à ce document.
- Ouvrir la page de démarrage rapide de PostgreSQL Installation quickstart de PostgreSQL.
- Cliquez sur Install now pour démarrer l’installation quickstart de PostgreSQL.
Configurer NRI-Prometheus
Exécutez la commande suivante pour créer un fichier de configuration NRI-Prometheus :
bash$touch /etc/newrelic-infra/integrations.d/nri-prometheus-config.ymlCollez le snippet suivant dans le nouveau fichier de configuration. Assurez-vous de mettre à jour les
cluster_nameeturlsavec vos champs pertinents :integrations:- name: nri-prometheusconfig:# When standalone is set to false nri-prometheus requires an infrastructure agent to work and send data. Defaults to truestandalone: false# When running with infrastructure agent emitters will have to include infra-sdkemitters: infra-sdk# The name of your cluster. It's important to match other New Relic products to relate the data.cluster_name: "YOUR_CLUSTER_NAME"targets:- description: Sonarqube metrics listurls: ["http://user_name:password@YOUR_HOST_IP:9000/api/monitoring/metrics"]# tls_config:# ca_file_path: "/etc/etcd/etcd-client-ca.crt"# cert_file_path: "/etc/etcd/etcd-client.crt"# key_file_path: "/etc/etcd/etcd-client.key"# Whether the integration should run in verbose mode or not. Defaults to falseverbose: false# Whether the integration should run in audit mode or not. Defaults to false.# Audit mode logs the uncompressed data sent to New Relic. Use this to log all data sent.# It does not include verbose mode. This can lead to a high log volume, use with careaudit: false# The HTTP client timeout when fetching data from endpoints. Defaults to 30s.# scrape_timeout: "30s"# Length in time to distribute the scraping from the endpointsscrape_duration: "5s"# Number of worker threads used for scraping targets.# For large clusters with many (>400) endpoints, slowly increase until scrape# time falls between the desired `scrape_duration`.# Increasing this value too much will result in huge memory consumption if too# many metrics are being scraped.# Default: 4# worker_threads: 4# Whether the integration should skip TLS verification or not. Defaults to falseinsecure_skip_verify: truetimeout: 10s
Installer et configurer l'intégration JMX
Pour utiliser l'intégration SonarQube, vous devez également installer notre intégration de monitoring JMX. L'intégration JMX récupère les données SonarQube, que nous transformerons plus tard en dashboard et en données interrogeables.
Ajoutez le snippet de code suivant à
/opt/sonarqube/conf/sonar.properties:# SonarQube Web Server JMX configuration.sonar.web.javaOpts=-Dcom.sun.management.jmxremote \-Dcom.sun.management.jmxremote.port=9010 \-Dcom.sun.management.jmxremote.authenticate=false \-Dcom.sun.management.jmxremote.ssl=false# SonarQube Compute Engine JMX configuration.sonar.ce.javaOpts=-Dcom.sun.management.jmxremote \-Dcom.sun.management.jmxremote.port=9011 \-Dcom.sun.management.jmxremote.authenticate=false \-Dcom.sun.management.jmxremote.ssl=falseAjoutez le snippet de code suivant à
/etc/newrelic-infra/integrations.d/jvm-sonarqube-web-metrics.yml/:collect:- domain: SonarQubeevent_type: JVMSampleSonarQubeWebMetricsbeans:- query: name=AsyncExecutionattributes:- QueueSize- WorkerCount- LargestWorkerCount- query: name=Databaseattributes:- MigrationStatus- PoolActiveConnections- PoolMaxActiveConnections- PoolIdleConnections- PoolMaxIdleConnections- PoolMinIdleConnections- PoolInitialSize- PoolMaxWaitMillis- PoolRemoveAbandoned- PoolRemoveAbandonedTimeoutSeconds- query: name=SonarQubeattributes:- Version- ServerId- LogLevelAjoutez le snippet de code suivant à
/etc/newrelic-infra/integrations.d/jvm-sonarqube-compute-engine-metrics.yml:collect:- domain: SonarQubeevent_type: JVMSampleSonarQubeComputeEngineMetricsbeans:- query: name=ComputeEngineDatabaseConnectionattributes:- PoolInitialSize- PoolActiveConnections- PoolMaxActiveConnections- PoolIdleConnections- PoolMaxIdleConnections- PoolMinIdleConnections- PoolMaxWaitMillis- PoolRemoveAbandoned- PoolRemoveAbandonedTimeoutSeconds- query: name=ComputeEngineTasksattributes:- PendingCount- LongestTimePending- InProgressCount- ErrorCount- SuccessCount- ProcessingTime- WorkerMaxCount- WorkerCount- WorkerUuids- EnabledWorkerUuidsAjoutez le snippet de code suivant à
/etc/newrelic-infra/integrations.d/jmx-sonarqube-compute-engine-config.yml:integrations:- name: nri-jmxenv:COLLECTION_FILES: /etc/newrelic-infra/integrations.d/jvm-sonarqube-compute-engine-metrics.ymlJMX_HOST: <YOUR_HOST>JMX_PASS: adminJMX_PORT: 9010JMX_USER: adminCONNECTION_URL: service:jmx:rmi://<YOUR_IP>:9010/jndi/rmi://<YOUR_IP>:9010/jmxrmiREMOTE_MONITORING: "true"interval: 15slabels:env: stagingAjoutez le snippet de code suivant à
/etc/newrelic-infra/integrations.d/jmx-sonarqube-web-config.yml:integrations:- name: nri-jmxenv:COLLECTION_FILES: /etc/newrelic-infra/integrations.d/jvm-sonarqube-web-metrics.ymlJMX_HOST: <YOUR_HOST>JMX_PASS: adminJMX_PORT: 9011JMX_USER: adminCONNECTION_URL: service:jmx:rmi://<YOUR_IP>:9011/jndi/rmi://<YOUR_IP>:9011/jmxrmiREMOTE_MONITORING: "true"interval: 15slabels:env: staging
Transférer le log SonarQube vers New Relic
Suivez ces étapes pour transférer le log SonarQube vers New Relic :
Créez un fichier de log nommé
logging.ymldans le chemin suivant :bash$cd /etc/newrelic-infra/logging.dAjoutez le script suivant au fichier
logging.yml:logs:- name: sonar_logsfile: /opt/sonarqube/logs/sonar.logattributes:logtype: sonar_logs- name: ce_logsfile: /opt/sonarqube/logs/ce.logattributes:logtype: sonar_ce_logs- name: es_logsfile: /opt/sonarqube/logs/es.logattributes:logtype: sonar_es_logs- name: web_logsfile: /opt/sonarqube/logs/web.logattributes:logtype: sonar_web_logs
Redémarrez l'agent New Relic Infrastructure
Redémarrez votre agent d’infrastructure :
$sudo systemctl restart newrelic-infra.serviceDans quelques minutes, votre application enverra des métriques à one.newrelic.com.
Trouvez vos données
Vous pouvez choisir notre modèle dashboard prédéfini nommé SonarQube pour monitorer les métriques de votre application SonarQube. Suivez ces étapes pour utiliser notre modèle dashboard prédéfini :
De one.newrelic.com, aller à la page + Integrations & Agents .
Cliquez sur Dashboards.
Dans la barre de recherche, tapez
sonarqube.Le dashboard SonarQube devrait apparaître. Cliquez dessus pour l'installer.
Votre dashboard SonarQube est considéré comme un dashboard personnalisé et peut être trouvé dans l'UI Dashboards. Pour obtenir des documents sur l'utilisation et la modification du dashboard, consultez notre documentation dashboard .
Voici quelques exemples de requêtes NRQL pour les données Postfix :
Quelle est la prochaine étape ?
Pour en savoir plus sur la création de requêtes NRQL et la génération de dashboards, consultez ces documents :
- Introduction au générateur de requêtes pour créer des requêtes basiques et avancées.
- Introduction au dashboard pour personnaliser votre dashboard et effectuer différentes actions.
- Gérez votre dashboard pour ajuster votre mode d'affichage du dashboard ou pour ajouter plus de contenu à votre dashboard.